Using Symbols to Create a Quick and Easily Updatable Photo Montage
Posted: December 22 2007
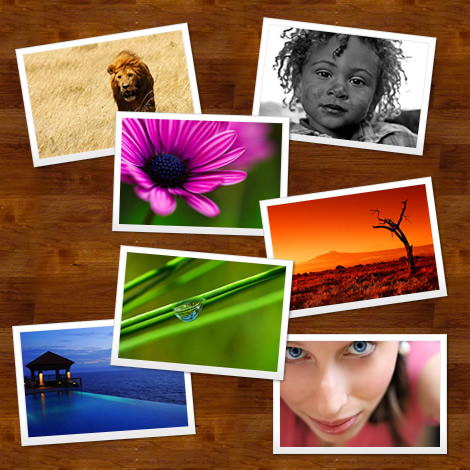
With the introduction of the Swap Symbol feature in CS3, Fireworks has given us an incredible flexibility to exchange objects quickly. One particular use is for a photo montage for your website as shown below. One can be created within minutes, and updated ridiculously easily, whenever the need arises.
First we set up the display table.
- Create a new 470x470 document.
- Draw a rectangle to fill the canvas.
- Give the rectangle a fill pattern of Wood 2.
- Rotate the pattern 90 degrees to the right, to make the grain horizontal.
- Extend the horizontal arm slightly, so it sits about 45 pixels from the edge.
- Bring the bottom arm up, again so it sits about 45 pixels from the edge.
- Copy this rectangle with either Copy and Paste or Clone.
- Set the fill to be solid and black.
- Change the opacity to 50%, and blend mode to Fuzzy Light.
- Rename this layer to 'Table BG' and lock it.
Now we need to insert our photos.
- Switch to the Pages panel, and create a new page. This will be where we store our originals.
- Import a photo that you wish to use. I just grabbed some from Flickr, so just copied and pasted into the document.
- Convert the image to a Symbol with F8 (Modify > Symbol > Convert to Symbol). Give it a meaningful name and press OK.
- Select your newly created symbol and copy it.
- Switch back to Page 1.
- Create a new layer called Photos, and paste.
You now need to resize the photo symbol to a size that you are happy with.
The photos I used were originally 500x333, so I decided to resize them to 160x106.
As the photo is a symbol, you can resize as much as you like, without the image losing quality.
- Draw a rectangle that is 7px larger than the photo around each side. In my case that's 174x130.
- Arrange this rectangle behind the photo.
- Manually position it so that the photo sits evenly in the centre. Do not use the Align commands or the edges may blur.
- Give the rectangle a linear gradient fill of #FFFFFF to #E6E6E6.
- Drag the gradient arm from the top node so that it sits approximately 30px from the bottom.
- Hold Shift, and drag the bottom node of the arm until it sits against the bottom of the rectangle.
- Give the rectangle a 1px #DFDFDF stroke.
- Apply a Drop Shadow filter with the following parameters - Distance: 2, Opacity: 55%, Softness: 2, Angle: 315, Colour: Black
- Draw a 162x108 solid #EDEDED rectangle with no stroke, and position so it that it sits evenly 1px out from the photo.
- Select the two rectangles and convert them to a symbol called Photo BG with F8 (Modify > Symbol > Convert to Symbol)8.
- Double-click the symbol to edit it. Both rectangles should be selected.
- Copy the rectangles with either Copy and Paste or Clone.
- Modify > Flatten Selection.
- Hide the two rectangles and press Done.
Steps 28-30 ensure that if you plan to use rotated photos, that the photo background will always look the highest quality. However, you can skip these steps if you set the symbol's transform mode to pixels using this command of mine, when it is selected on the canvas.
I kept the two original rectangles so you can make modifications to them if you wish.
Now to create our montage.
- Select both your photo and background symbols.
- Group them with Modify > Group.
- Copy and Paste for however many photos you plan to have in your montage. In my case, seven are used.
- All you need to do now is drag each group around, rotating, and arranging as necessary.
- Select All, and then Ungroup with Modify > Ungroup.
Now it's time to bring in the rest of the photos.
- Switch to Page 2 and import the rest of the photos that you wish to use.
It is important to note that all of the photos should be identical in size.
- Convert each photo to a symbol with F8 (Modify > Symbol > Convert to Symbol) and name appropriately.
Now it's time to finish the montage.
- Switch back to Page 1.
- Now select each photo in turn, and swap the symbol with one of the other ones using Modify > Symbol > Swap Symbol or by right-clicking > Swap Symbol.
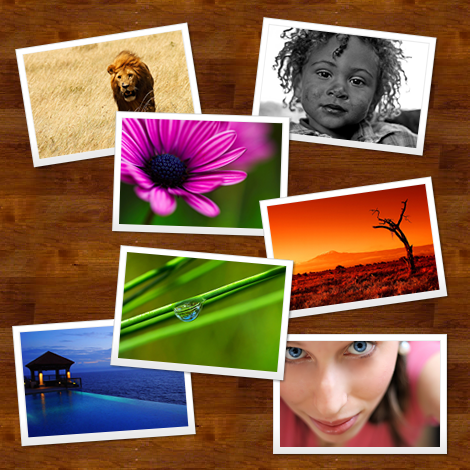
Voila! Your photo montage is complete.
I mentioned earlier that the photos converted to symbols had to be the the same size. While this is not strictly true, it certainly makes things easier.
If you swapped symbols that were different sizes, you would get unexpected results. You cannot swap a symbol and keep the same dimensions.
Download the original Fireworks PNG (2.67Mb)
Copyright © 2013 Matt Stow. Firewoiks is powered by NomusNavigator.